Banjo Repair
Banjo Tone - The Holy Grail...
18/10/11 23:02 Filed in: Banjo Setup
The Quest...
I’ve spent a considerable amount of time during the last year tearing apart my Deering/Vega long-neck and then putting it back together. To the dismay of my long suffering spouse, my kitchen table has been turned into a workbench covered with a variety of banjo heads, tailpieces, bridges, strings and the ungodly amount of instrument repair tools I've collected over the last thirty years.
What precipitated this intrusion into our otherwise simple lifestyles was a simple modification to two of my banjos: frailing scoops.
What I didn't take into account was the uncontrollable urge to tinker with the setup of my Vega Longneck while the banjo was dismantled. I mean, what the heck, I had already taken the neck off. Why not go for it? So forgetting the cardinal rule that “if it ain't broke - don't fix it”, I gleefully threw myself into the nightmare caused by the endless permutations of tone created by the following variables:
• Head Type
• Head Tension
• Tail Piece Type
• Tail Piece Tension
• Bridge type
• Bridge thickness
• Action (string height)
• String gauge
• Head dampener
• Size of head dampener
(To be quite honest, some of the setup adjustments were unavoidably brought about by changes in my playing technique. The addition of a scoop will move the right hand's primary playing position further away from the bridge, which then brings about a corresponding change in banjo tone.)
I was having a mason rebuild my fireplace while I was going through this whole process, which explains how I managed to subdue the urge to turn my banjo into firewood and burn it...
The Plan...
Before starting to tinker with my banjo, I had to answer the following questions:
1. What type of tone do I need from my banjo? Do I want a dark, tubby, resonate tone? A plunky sound? Or maybe a bright sound that could cut through a noisy jam?
The Answer? My Vega long-neck needed to be versatile enough to function at a contra dance, a Blue Sage Band concert, or a solo performance. In a pinch it might even need to function as a bluegrass banjo! For this, I decided to shoot for a defined, somewhat plunky sound that was strong in the med-range frequencies.
2. How much volume do I want my banjo to produce under normal playing conditions? I know that an instrument that is too loud can cause me to "hold back" with my right hand, which will result in thin tone and a loss of accuracy with my right hand. A quiet instrument can cause me to play too aggressively, resulting in almost the same problems as a loud instrument; my tone and right hand accuracy suffer.
The Answer? I need a relatively quiet banjo, so I toned down my banjo to the point where it wouldn't drown out my voice when playing in an all acoustic setting. For jams, I use a modified finger pick for extra volume.
3. How high do I need to set the action (string height)? Too low and I'll get string buzzing unless I play everything with a very light right hand touch (which would hurt my tone, accuracy, and volume). Too high of an action and I won't be able to play comfortably above the fifth fret, and I need the whole fingerboard for my style of play.
The Answer? I tried to find that sweet spot where the action was low enough to allow me to play comfortably in the higher frets, but high enough to not buzz if I "dug in" a bit; not an easy compromise on a long-neck banjo. This is an ongoing process as outside forces, such as humidity, are constantly trying to thwart all my hard work...
The Journey...
Head - Type & Tension
Changing out the head produced the single greatest change in tone, far more than any other factor.
I found a few surprises while experimenting with banjo heads. For instance, one consequence of changing head types was a drastic change in string action (string height). If my banjo was setup for a regular frosted head (a relatively loose tension),a switch to a fiberskyn head (high tension) would cause a hugh rise in string height. If you think you can easily swap out different styles of heads, without swapping bridges or adjusting neck angle, you're in for a very rude awakening...
I tried four different banjo heads with the following results:
- Remo Frosted - the tone was a little too bright by the time I got the tension up to the point where the bridge didn't sag and the unwanted overtones disappeared.
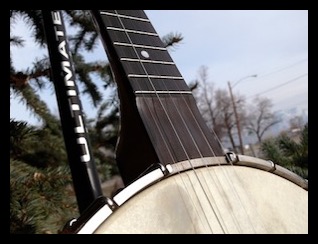
- Remo Renaissance (top picture) - I used one for a couple of years. Nice plunky tone, but not quite what I was looking for, especially when playing up the neck.
I found that contrary to the advise usually given concerning head tension for clawhammer banjos, I needed to crank the head up TIGHT when using the Fiberskyn or Elite heads. Once tightened sufficiently, the Elite had the best tone, up and down the neck, of all the heads I tried out in this trial.
Frailing Scoop
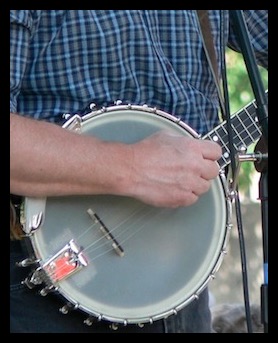
Next to changing head types, the most noticeable change in tone was produced by the addition of a frailing scoop. Note that this change in tone was due to a change in playing technique; if my right hand position remained the same, so did my tone! A scoop allows out you to play over the fingerboard which produces a mellower tone. You can see the new scoop in the bottom photo.
Tailpiece - Type & Tension
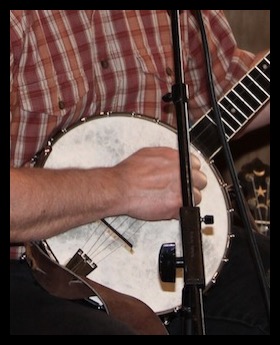
I tried three different tailpieces: Presto, Waverly, and No-Knot. Of the three, the Waverly was the hands down winner. The Presto muted the instrument too much and the No-Knot was a little too "open" (mushy) sounding. The Waverly, coming somewhere in between the other two in length, was the right choice for this particular banjo.
The main tailpiece factors affecting tone are mass, length and tension. The only way I found to control mass and length, was to swap out tailpieces. That left tension as the only variable I could adjust while actually playing, and the only tailpiece that had a mechanism to adjust tension was the Waverly; which might have given it a slight advantage over the other two. Keep in mind that there are other tailpieces available which have the ability to adjust tension and I encourage you to try them out.
I should also point out that adjusting tailpiece tension is a great way to fine tune tone; it's the final and most frequently performed adjustment I do when setting up my banjos (if equipped with adjustable tailpieces).
Head Dampener (Mute)
It’s surprising how much the longer neck adds to the total weight of my Vega, and that extra mass means too much sustain (at least for me). To combat this sustain, I’ve added “dampeners”; strips torn from an old bath towel (terry cloth ) rolled up and placed between the head and the coordinator rods. By varying the width of the strips, I find I can control the amount of dampening that takes place. In the top photo, you can see the rolled up terry cloth under the tailpiece.
Armrest
When I swapped out the armrest, the change in tone was so minor that I didn’t include it in my list above, but you can see in the photos that I did switch armrests (as well as heads and tailpieces).
Bridge
Although I did swap out my bridges a few times, I stuck with the same builder: Snuffy Smith. Long ago, I tried a multitude of different bridges and found the Smith bridges to be the most consistent. I should point out that Snuffy Smith was good enough to build me a few extremely tall bridges which I used on the thinner heads (thanks!).
Strings
I didn’t make any changes in brand or string gauges. If you want more information on the custom string gauges I use on my Deering/Vega Long-neck, you can visit this page: Mike’s Instruments
The Journey’s End?
King Arthur’s quest for the Holy Grail was futile, the point of the quest turned out to be the journey itself and not some prize found at the end. The lesson learned is that there is no “perfect” banjo tone that works equally well for every song; the key is compromise...
Although I know I’ll be fine tuning the tone of my Vega forever, I’ve now got my banjo sounding close to the goal I set for myself; it’s a good compromise of tone that can work whether I’m playing a dance, a solo show, or even playing bluegrass banjo.
Find the tone that is best for your own personal playing style and don't try to set your banjo up using someone else's formula, including mine! Remember that the single biggest factor affecting tone is you!
Although the banjo is the "hot rod" of the acoustic music world, and allows you to modify the tone more than any other acoustic instrument, the most important step in setting up your banjo's tone (other than your own personal playing technique) is the instrument itself — so make sure you start with a banjo you love...
Mike Iverson
Comments